Is the lock screen on your Windows 10 or 11 PC suddenly displaying Chinese characters? That could happen due to several reasons, ranging from incorrect region settings on your PC or Microsoft account to a faulty Windows update. Fortunately, addressing this issue is not as daunting as it may seem.

It’s natural to feel concerned when Windows starts showing Chinese characters on your lock screen. However, this is not necessarily indicative of malware or a security breach. Instead, it often stems from incorrect region settings or a buggy Windows update. Nevertheless, there are some tips that you can follow to fix the problem and restore the familiar lock screen experience.
1. Check the Region Settings
Windows uses your region settings to determine the language in which content should appear on the lock screen. If the set region on your PC is incorrect, the lock screen may display content in a language different from your preference or expectation.
To fix this, you need to correct the region settings on your PC using the following steps:
Step 1: Press the Windows key + R keyboard shortcut to open the Run dialog box. Type control in the box and press Enter.

Step 2: Change the view type to Large icons and click the Region option.

Step 3: Click the drop-down menu under Format to select English (United States) or your preferred option.

Step 4: Switch to the Administrative tab and click the Copy settings button. Then, hit Apply followed by OK.

Restart your PC after completing the above steps. After that, the Windows lock screen should not show Chinese characters.
2. Set the Correct Region for Your Microsoft Account
If correcting the region settings on your Windows PC proves ineffective, check the language and region settings for your Microsoft account to stop Chinese characters from appearing on the lock screen. Here are the steps for the same.
Step 1: Open a web browser and head over to Microsoft’s website. Sign in to the Microsoft account that you’re using on your PC.
Step 2: Click the Your info tab in the left pane. Then, click Country or region on your right.

Step 3: Use the drop-down under Country or region to select the correct option and hit Save.

Step 4: Return to the previous menu and click the Language option.

Step 5: Set display and preferred languages to English.

Close the browser and restart your PC one more time for the changes to take effect.
3. Disable and Enable Windows Spotlight
Several users on a Microsoft Community post reported fixing the issue of Chinese characters appearing on the lock screen by disabling and re-enabling the Windows Spotlight feature. You can also give it a go.
Step 1: Open the Start menu and click the gear-shaped icon to launch the Settings app.

Step 2: Use the left pane to switch to the Personalization tab and click Lock screen.

Step 3: Click the drop-down menu next to Personalize your lock screen to select Picture.

Press the Windows key + L to visit the lock screen. If this solves your problem, you can re-enable the Windows Spotlight feature using the same steps outlined above.
4. Uninstall the Recent Windows Update
Has your Windows 10 or 11 PC started showing Chinese text on the lock screen right after an update? If so, the issue may be related to a bug within the update. In that case, you can fix it by uninstalling the recent Windows update. Don’t worry; removing a Windows update is completely safe and will not affect any of your data.
There are several ways to uninstall a Windows update, but the easiest one is through the Settings app. Here are the steps for the same.
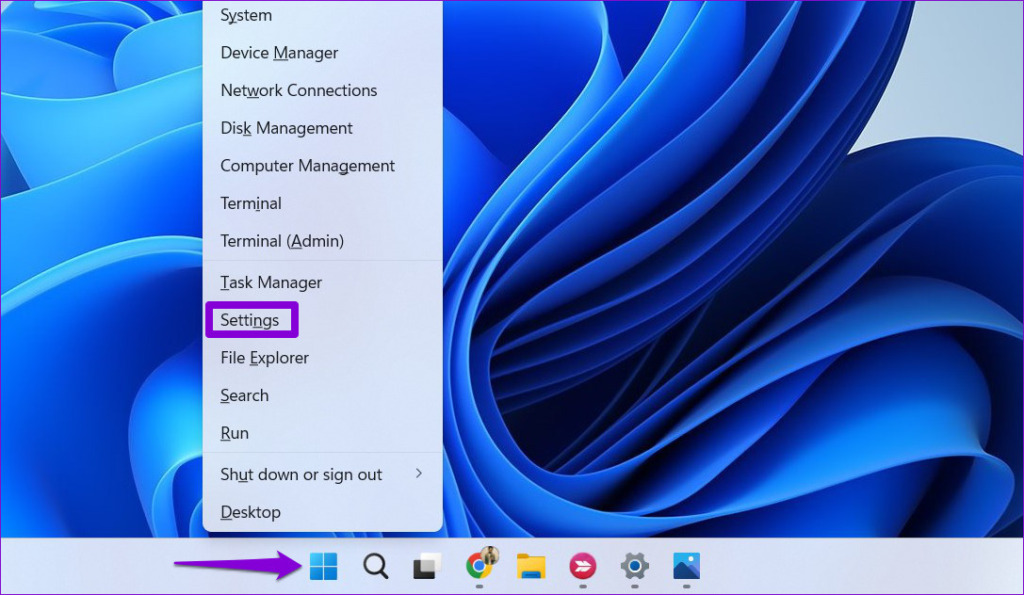
Step 1: Right-click on the Start icon and select Settings from the list.

Step 2: Navigate to the Windows Update tab and click on Update history.

Step 3: Under Related settings, click on Uninstall updates.

Step 4: Locate the most recent update by checking the installation date and then click the Uninstall option next to it.

Follow the on-screen prompts to complete the process. After that, your Windows 10 or 11 lock screen should not display content in Chinese language.
Unlock Clarity
Seeing the Windows lock screen display content in your non-native language can disrupt your computing experience. Hopefully, applying the above tips has helped you fix that, and the Windows lock screen is now showing content in your preferred language.
Was this helpful?
Last updated on 19 February, 2024
The article above may contain affiliate links which help support Guiding Tech. The content remains unbiased and authentic and will never affect our editorial integrity.


