ChatGPT is one of the most popular natural language generation models that provide solutions to almost every query. However, OpenAI released ChatGPT to the public so that it could train and improve its database. If you are concerned about your privacy and data or don’t want to use the service anymore, you can delete your ChatGPT account.
However, there’s no option to deactivate your OpenAI account. If you don’t wish to use it, you can either take some time off or delete the account permanently and its associated data. Moreover, before we jump into the steps to delete your ChatGPT account, there are some things to remember.
Things to Know Before Deleting Your ChatGPT Account
Here are some significant points you need to know before deciding to delete your ChatGPT account. Because once you do it, there’s no going back.
- Once you delete your account, you cannot restore it.
- All the conversations will be removed.
- You can’t use the same email and phone number linked to the existing account to create a new account.
- All the services that use the APIs associated with your account will stop working.
- Even after deleting your ChatGPT account, you will continue to receive newsletters, updates, and other communications from OpenAI and ChatGPT unless you unsubscribe from them.
With that out of the way, let’s move on. If you wish to keep a copy of your conversation, you must do so before deleting your account. Move on to the next section to do so. If not, you can skip to the account deletion process.
Export ChatGPT History and Data
Before we look at the steps to delete your ChatGPT account, it’s better to take a backup of your account since deleting your account will also delete your ChatGPT conversations. Here’s how you can export your ChatGPT data.
Step 1: Open ChatGPT on your preferred web browser.
Step 2: Open the sidebar and click the three dots icon next to the username.
Step 3: Choose Settings.
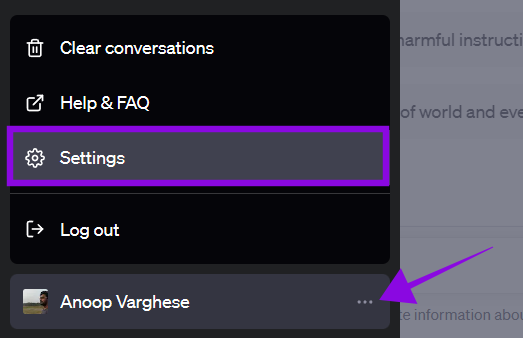
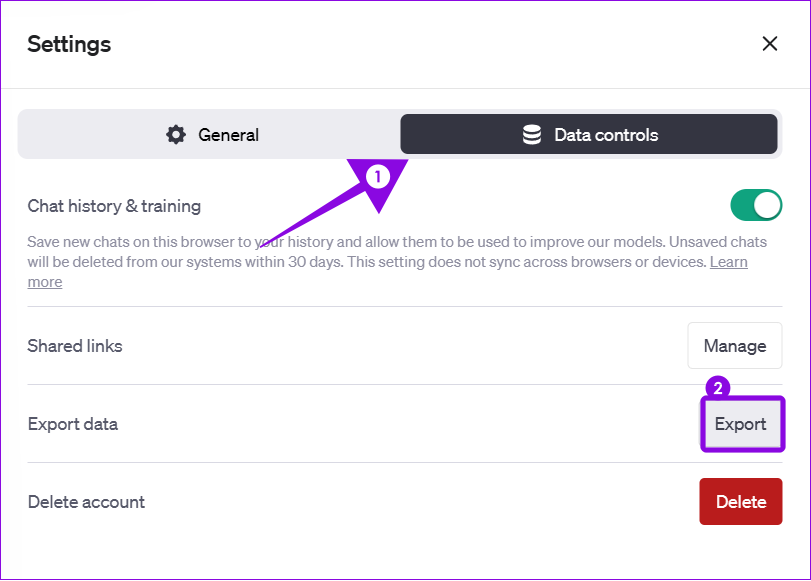
Step 4: Select Data controls and choose Export next to Export data.
Step 5: Choose Confirm Export. The data will then be sent to your linked email.

Step 6: Open the email from OpenAI and hit ‘Download data export.’
Note: The link will only last for one hour once generated. So, ensure to download it within that period.

Step 7: Choose a location to save and hit Save.
Step 8: Visit and open the file.
Step 9: If you want to see the entire history, open Chat.

Since the data is saved offline on your system, you can access it anytime. You can also back up the data to any cloud storage to access it from anywhere.
Delete ChatGPT Account
Now that you have exported your data, let’s look at how to delete your ChatGPT account.
Step 1: Visit the ChatGPT website using the link below.
Step 2: Open the sidebar and choose the three dots icon next to your username.
Step 3: Choose Settings.

Step 4: Select Data controls and choose Delete.

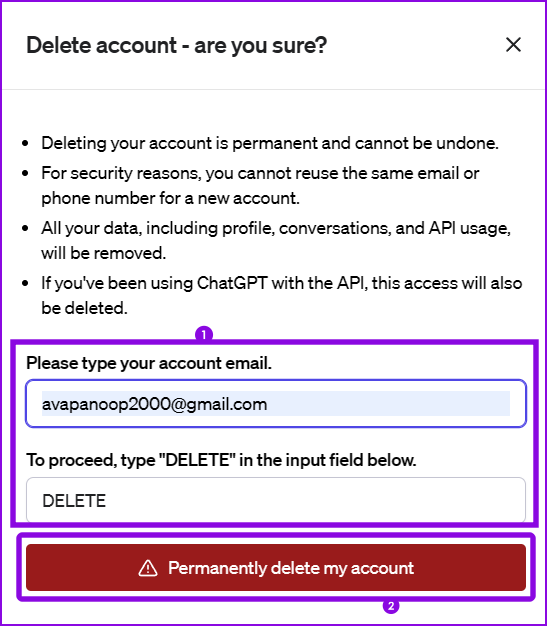
Step 5: Enter the linked account email id and type Delete in all caps.
Note: If you have been using ChatGPT for a long time (more than 10 minutes), hit Refresh login and log in again.
Step 6: Once you fill the all the relevant fields, hit ‘Permanently delete my account.’
If you don’t want to share your data with ChatGPT, toggle off ‘Chat history & training’ from ChatGPT settings.
Alternatively, you can ask the OpenAI team to delete your ChatGPT account using the Help option. However, the process takes up to 4 weeks.
FAQs on Deleting ChatGPT Account
You can check our detailed guide on deleting your Google account, where we have explained everything you need to do and what you should know about it.
You cannot remove your phone number from a ChatGPT account. The only way to unlink your phone number is by deleting the linked ChatGPT account.
ChatGPT 4 is a paid service, so you won’t be able to use it for free. However, you can use BingChat on your browser for free, as it is powered by the GPT4 powers it.
Take Control of Your Data
ChatGPT is a great platform to get information in an interactive way. However, you might lose interest in it over time for various reasons. By knowing how to delete your ChatGPT account, you can end access to the service and prevent it from accessing your data. If you still have any queries, share them in the comments below.
Was this helpful?
Last updated on 26 June, 2023
The article above may contain affiliate links which help support Guiding Tech. The content remains unbiased and authentic and will never affect our editorial integrity.

