Double-clicking the left mouse button is the conventional way to open apps and windows on Windows PCs. However, most modern-day compact laptops often feature touchpads instead of a mouse, and a double-click on a touchpad can be less comfortable. Therefore, you may prefer the single-click feature as the primary method for opening apps and windows on your Windows PCs.

Moreover, you might not want to click or tap twice when one click is enough to access whatever you want. Keep reading to learn how to enable or disable the single-clicking feature in Windows and earlier Windows operating systems.
Why Change Double Click to Single Click on Windows
Here are the popular reasons why you may want to use a single click to open content on Windows rather than a double click:
- You’re using a touchpad on a laptop or tablet PC, and a single click is more comfortable.
- A single click saves time and effort.
- Increase the life of a mouse by reducing clicks.
- The double-click feature of your mouse isn’t working properly.
- It’s easier to access apps and files for those users who are unable to perform double-click efficiently.
How to Change Mouse to Single Click to Access Items on Windows
There are many ways to activate the single click to open files, folders, and apps instead of a double click on Windows. Find the commonly used methods here:
1. Use the Folder Options Setting to Open Items With a Single Click
Step 1: Open This PC on your Windows PC.
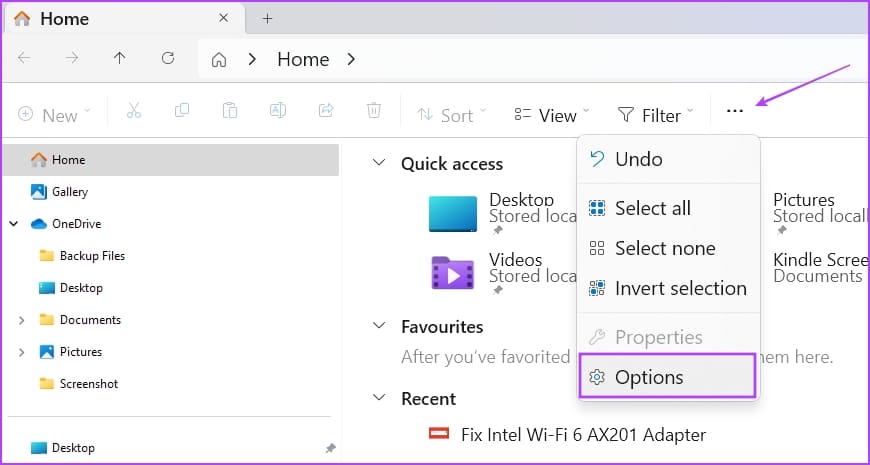
Step 2: On the top menu or toolbar, click on the three dots icon.
Step 3: Select Options.
Step 4: Under the Click items as follows option, select the Single-click to open an item (point to select) option.
Step 5: Here, you can also choose any of the following items highlighting options:
- Underline icon titles consistent with my browser: all icons and items will look like a hyperlink on the web browser
- Underline icon titles only when I point at them: pointing an item or icon will show up a hyperlink that you can click to visit the app, folder, or file
Step 6: Click the Apply and OK buttons to save and enforce the changes.
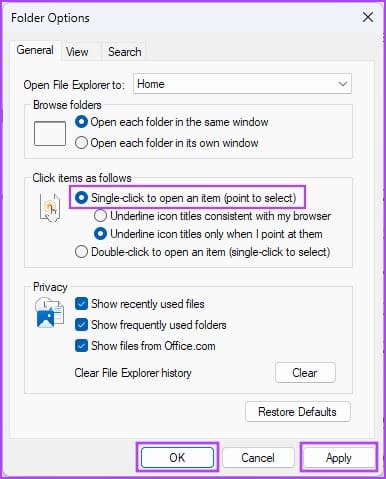
Step 7: When you want to get back the double-click functionality to open files, folders, and apps, simply go to the Folder Options > General and hit the Restore Defaults button.
2. Use the File Explorer Options Dialog Box (On Earlier Versions of Windows)
Similar to the Folder Options mentioned earlier, there’s a File Explorer Options menu that lets you activate or deactivate the single click to open items on Windows. Here’s how it’s done:
On Windows 10 and 8
Step 1: Hit the Windows + S keys together to bring up the Start menu.
Step 2: Start typing File Explorer, and the File Explorer Options hyperlink will show up under the Best Match section of the search results.
Step 3: Click on File Explorer Options. The File Explorer Options dialog box is nothing different than the Folder Options we showed earlier.
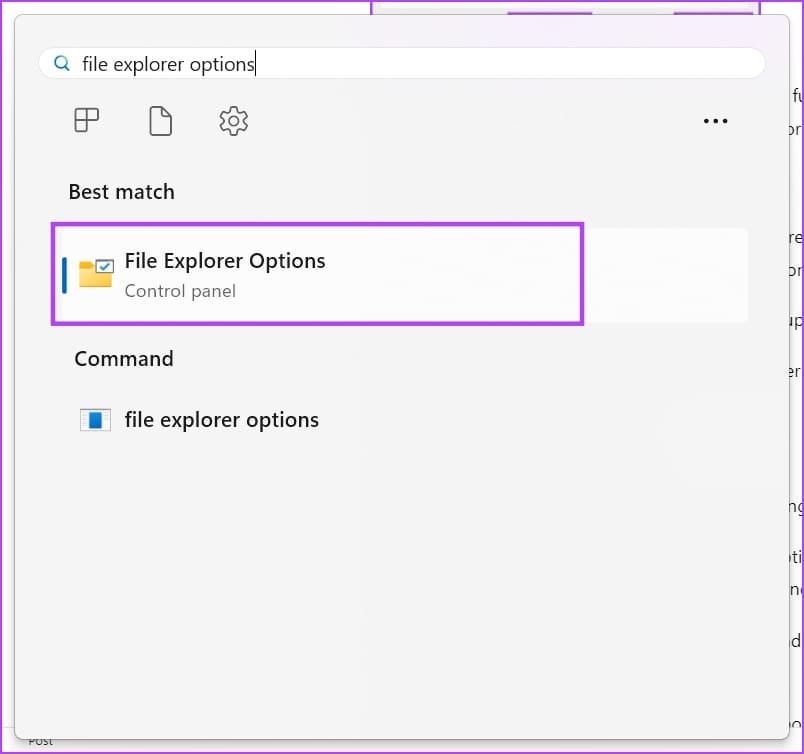
Here’s how you can open the menu on older versions of Windows.
On Windows 7 and Vista
- Right-click the Start button and select Control Panel.
- Select the Appearance and Personalization option on the left-side navigation pane.
- Click the Specify single- or double-click to open the link under the Folder Options setting.
On Windows XP
- Click Start and then go to the Control Panel by clicking its icon.
- Open the Folders option.
Step 4: Here, you can also choose any of the following items highlighting options:
- Underline icon titles consistent with my browser: all icons and items will look like a hyperlink on the web browser
- Underline icon titles only when I point at them: pointing an item or icon will show up a hyperlink that you can click to visit the app, folder, or file
Step 5: Click the Apply and OK buttons to save and enforce the changes.

3. Enable Single Click to Open Items Using the Registry Editor
When you cannot activate the single click to open apps and files on Windows using any of the above two methods, modify the Windows Registry keys by following the following steps. Don’t forget to back up the Registry entries by referring to the linked article before performing this method.
Step 1: Open the Run command box by hitting the Windows + R keys.
Step 2: Then, type ‘regedit’ in the Run box and hit Enter.
Step 3: The Registry Editor shall open.

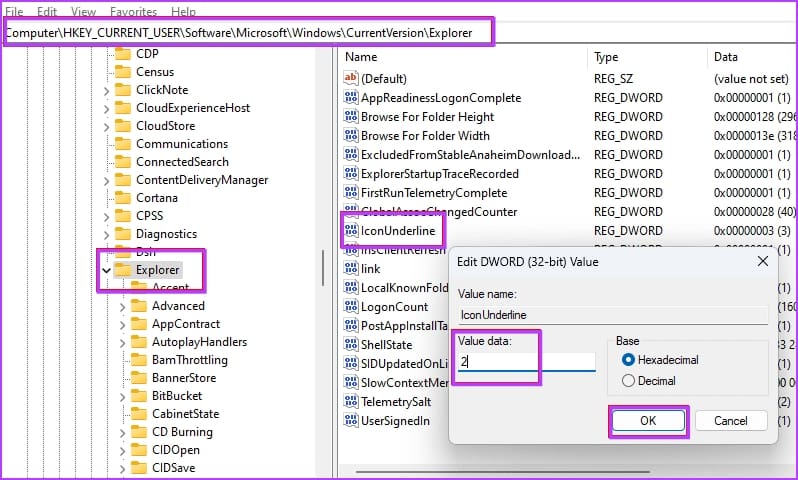
Step 4: Go to the Explorer key from HKEY_CURRENT_USER by expanding these Registry entries: HKEY_CURRENT_USER -> Software -> Microsoft -> Windows -> CurrentVersion -> Explorer
Step 5: When inside the Explorer key, follow these steps:
Step 6: Double-click the IconUnderline and change the value to 2. (Default value is 3)
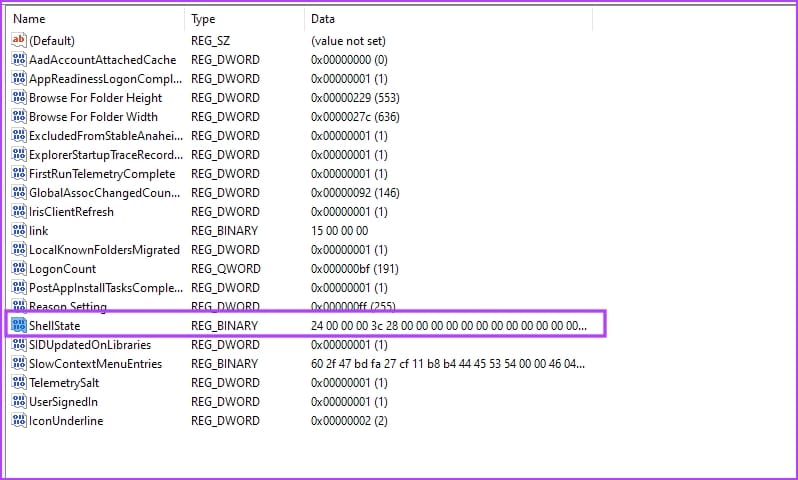
Step 7: Double-click the ShellState Registry entry.
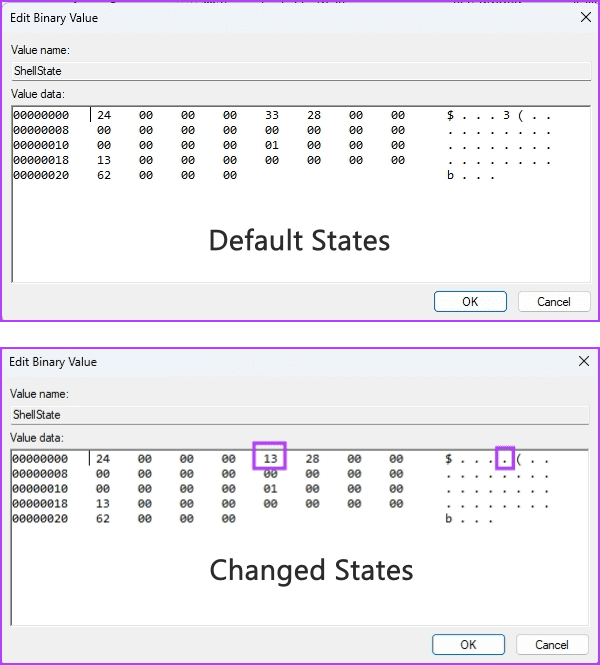
Step 8: Make the necessary changes as shown in the below image and click on OK.
To help you understand the changes, we’ve added a comparison between the default states and the changes that need to be made. You need to replace the value of the fifth column in the first row with 13.
Step 9: After making the above changes, restart your Windows PC.
Now, you should see the same single-click functionality to open files and elements as you saw in the previous methods.
4. Use the Command Prompt to Activate Single-Click to Open Items
If you find the above-mentioned Registry Editor tweak complicated, follow these steps to activate single-click on Windows using Command Prompt.
Step 1: Open the Command Prompt with administrator rights. Search for the command prompt in the Start menu, right-click, and select ‘Run as administrator’.
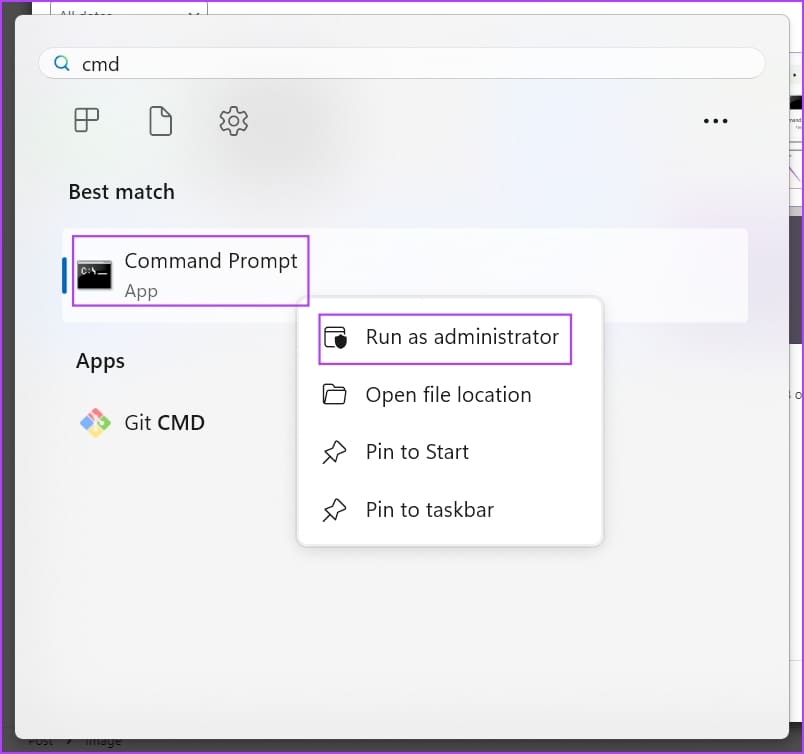
Step 2: Now, copy-paste the following code and hit Enter:
REG ADD "HKCU\SOFTWARE\Microsoft\Windows\CurrentVersion\Explorer" /V IconUnderline /T REG_DWORD /D 3 /F
Step 3: Again, copy and paste this command and hit Enter:
REG ADD "HKCU\SOFTWARE\Microsoft\Windows\CurrentVersion\Explorer" /V ShellState /T REG_BINARY /D 240000001ea8000000000000000000000000000001000000130000000000000062000000 /F
Step 4: Restart the Windows PC.
That’s it! You’ve successfully activated the single-click function to open elements on your Windows PC.
FAQs on Windows Single Click Feature
A single click of the left mouse button lets you select elements on a Windows PC. However, for hyperlinks on Windows user interfaces (UI), web browsers, and documents, a single click lets you visit the linked window, dialog boxes, or website landing pages.
Normally, you use a single click to select an app, folder, document, or file on Windows 10. Contrarily, you use a double click to execute commands like open apps, files, documents, user interface links, etc.
The single click on a Windows PC or other popular computing devices can be of two types, and these are as outlined below:
– A single click of the left mouse button to select content or app icons.
– A single click of the right mouse button to open the Properties of a file, folder, UI element, or app icon.
When using the Mouse Keys feature on Windows 11 or 10 devices, you can use the numeric 5 key on the Num Pad or number pad section as the left click or right click, similar to a physical mouse.
First, hit the division (/) key on the Num Pad and then press 5 to perform a left click. When you need a right click, just press the minus (-) key on the Num Pad and then press the 5 key to perform a right click.
Use Single Click Easily
Now you know how to enable the single-click feature on Windows 11 and the earlier versions as well. Try out the method that suits your needs and device, and comment below about your experience of using this feature on your Windows PC.
Was this helpful?
Last updated on 04 November, 2023
The article above may contain affiliate links which help support Guiding Tech. The content remains unbiased and authentic and will never affect our editorial integrity.


