Has your Windows device dropped off its pace, or are you facing an unexpected crash from an app that was launching perfectly fine previously? Follow our step-by-step guide to perform a clean boot on your Windows 11 device and open it with minimal apps to fix the issue.
Initiating a clean boot can provide a streamlined environment for diagnosis, empowering you to pinpoint and address issues hindering the optimal functionality of your computer. Before diving deep into how we can open it, let’s first check what a clean boot on Windows is.
What Is Clean Boot on Windows
A clean boot in Windows is a troubleshooting technique that helps you identify software conflicts causing issues with your computer. Moreover, it allows you to start your Windows device with the essential system services and drivers loaded.
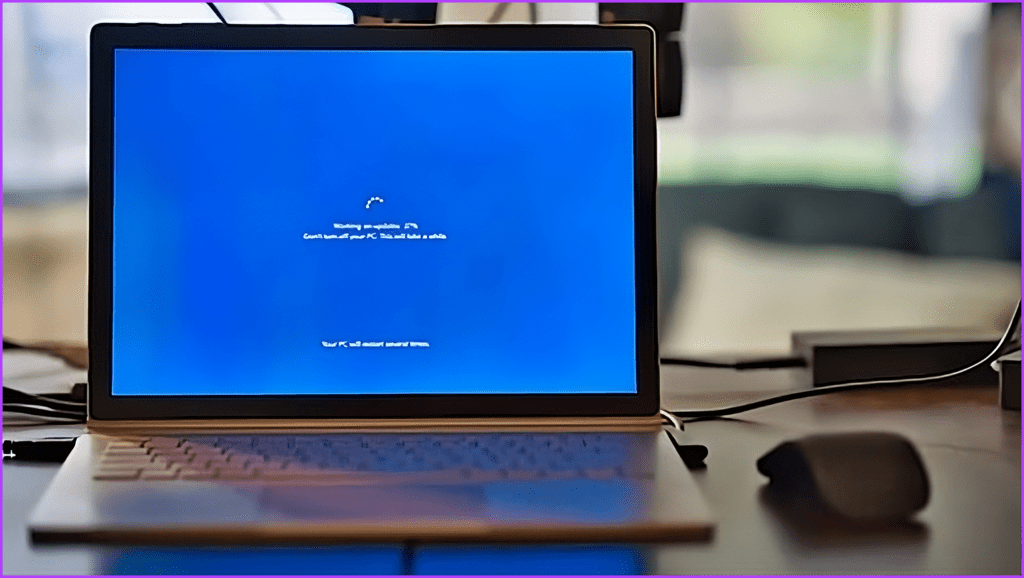
It temporarily disables all the non-essential programs and startup items to achieve that state. This creates a bare-bones environment, isolating the potential culprit behind your problem.
When Should You Use Clean Boot on Windows
Now that you’re well aware of what a clean boot does, let’s check when you should use it:
- Slow Startup: If your Windows device takes forever to boot up, a clean boot can help determine if a startup program is slowing things down.
- General Sluggishness: When your device is sluggish or unresponsive, a clean boot can help narrow down the culprit to a background program or service.
- High CPU or Memory Usage: If you’re seeing consistently high CPU or memory usage, this method can help you identify the app or process causing the drain.
- Program Crashes: When the programs on your Windows device keep crashing, a clean boot is a good option to see if they conflict with another program or service.
- System Errors: If you see frequent system errors, this technique can help pinpoint the cause.
- Blue Screens of Death (BSOD): Using a clean boot can help identify the driver or software causing the crash and returning BSOD.
- Installing a New Program: If you plan to install a new program that might conflict with existing software, running a clean boot beforehand can help avoid problems.
- Updating Drivers: Before updating your drivers, especially graphics drivers, this technique can help ensure a smooth installation process and prevent potential conflicts.
Also Read: How to fix Blue Screen of Death when PC is idle on Windows 11.
How to Clean Boot on Windows
Follow the simple instructions below to perform a clean boot on your Windows device:
Step 1: Press Windows + S on your keyboard, type System Configuration, and hit Enter. Select Yes in the pop-up window.

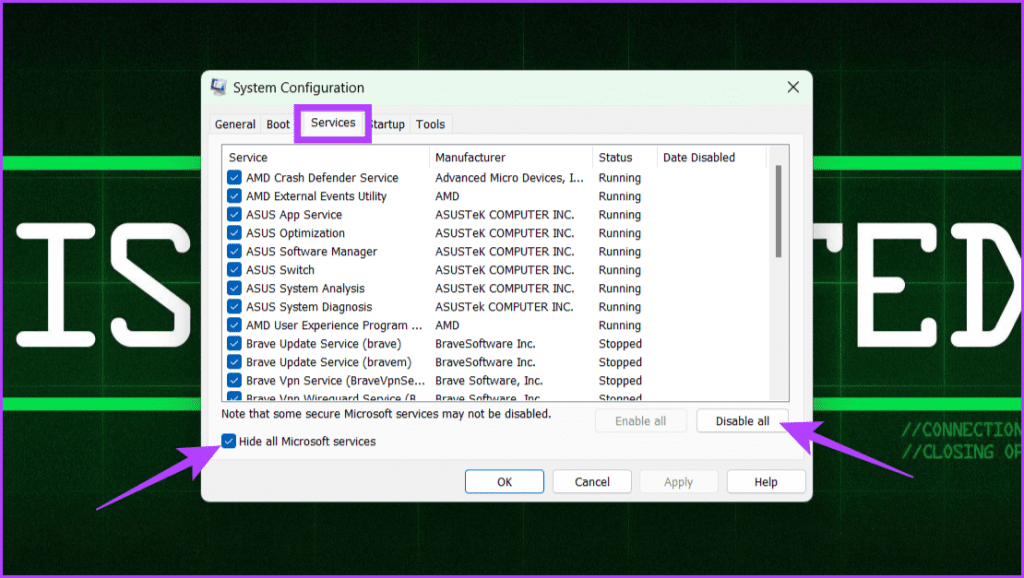
Step 2: Head to the Services tab, check the box next to Hide all Microsoft services, and click the Disable all button.
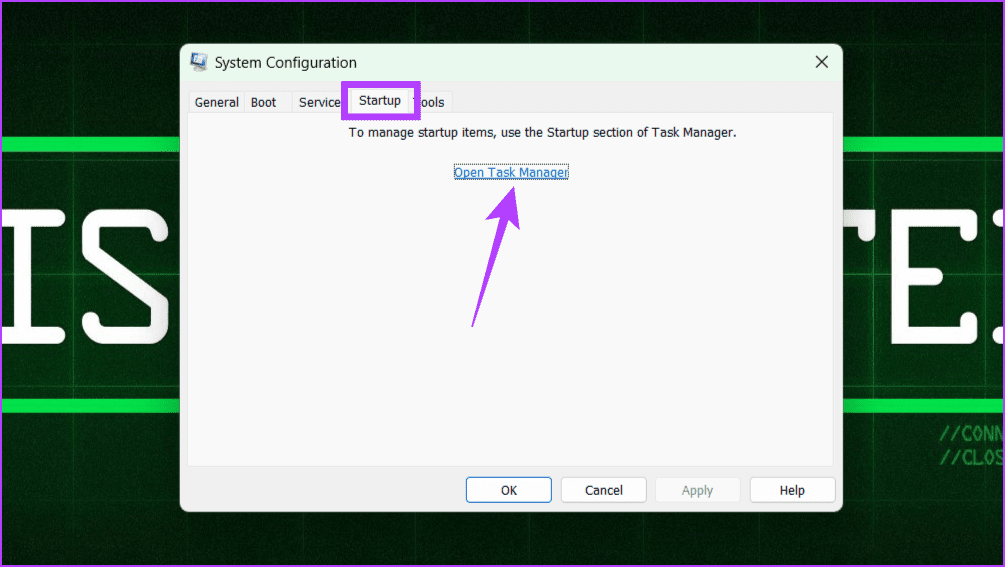
Step 3: Navigate to the Startup tab and click the Open Task Manager option.
Step 4: Under the Status section, check all the enabled applications. Now, right-click on them and choose Disable.
Note: Make sure each of those apps is disabled.
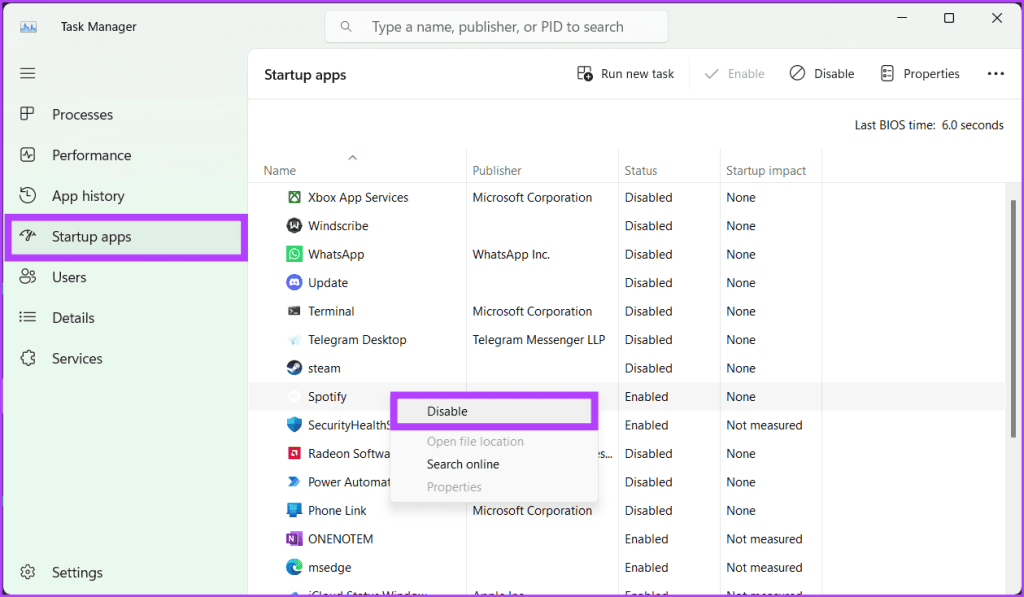
Step 5: Close the Task Manager once done.
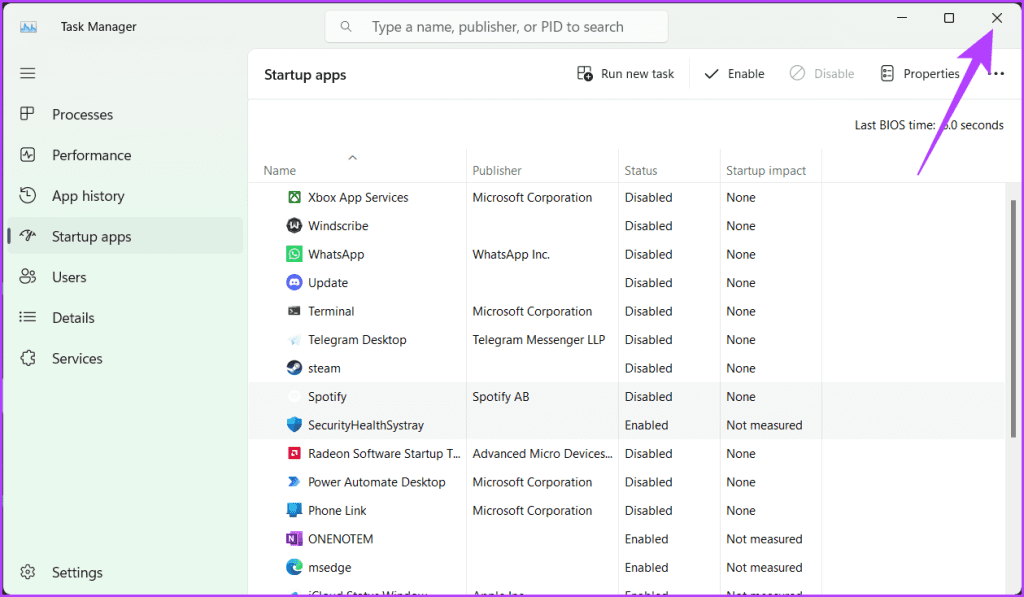
Step 6: Head back to the System Configuration window and click Apply and OK.

Step 7: Finally, restart your Windows device.
Disabling services and startup apps can affect certain software or hardware functionality. If you encounter issues after disabling items, you may need to re-enable them selectively. When in a clean environment, check if the problem persists.
If your device works well in a minimal environment, go ahead and enable all the apps one by one; this will help you find the app causing this issue. Here’s how to do so:
Step 1: Launch the Task Bar by pressing your keyboard’s Ctrl + Shift + Esc key. Choose Yes when prompted.
Step 2: Head to the Startup apps, right-click on each app, and select Enable.
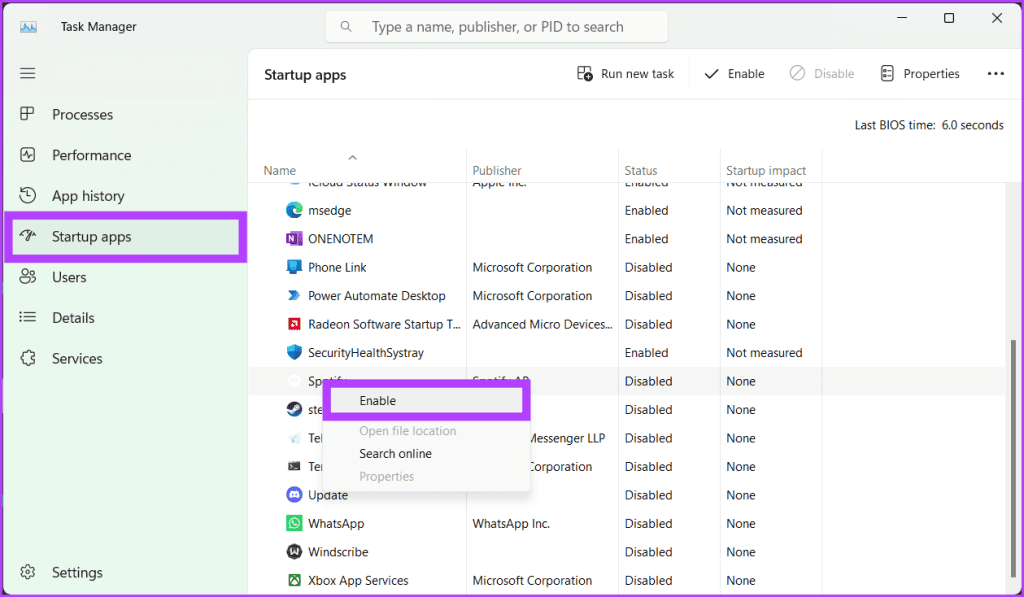
Step 3: Restart your device each time you enable an app and check if the issue arises.
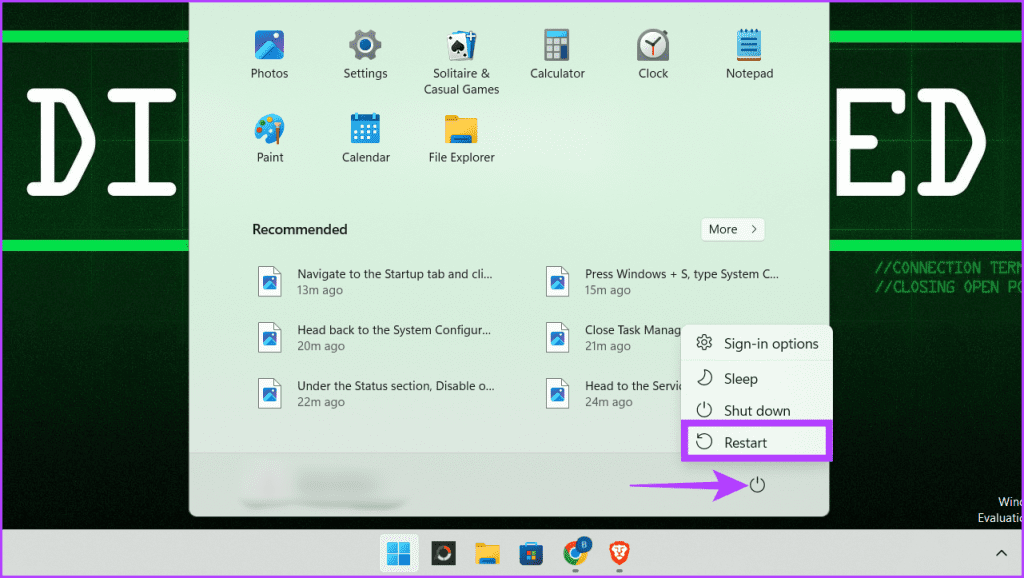
Step 4: Repeating this process will help you find the culprit behind the troubles on your device.
Also Read: How to fix Windows 11 stuck on Restarting screen.
What to Do After Clean Boot
Once you’ve successfully performed a clean boot on your Windows device, here’s how to proceed:
Step 1: Launch the Run box by pressing your keyboard’s Windows + R keys. In the search box, type msconfig and hit Enter. Select Yes when prompted.

Step 2: Ensure that you are in the General tab. Click the radio button next to Normal startup. Press Apply and OK.
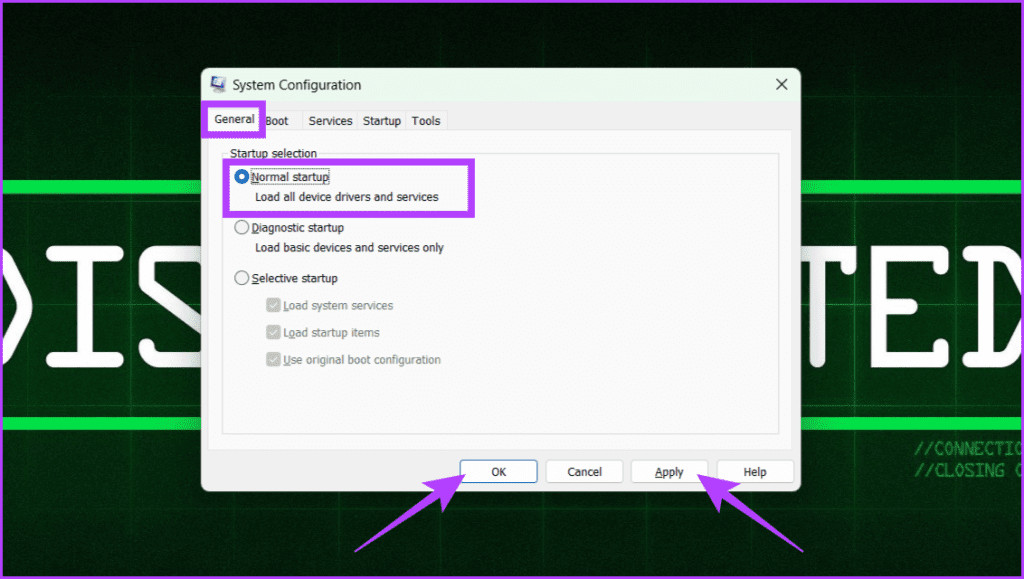
Step 3: Finally, click the Restart button when prompted.
Windows Clean Boot vs. Safe Mode vs. Normal Boot
Many users confuse Windows Clean Boot with Safe Mode and Normal Boot. Here is a detailed comparison between the three to help you understand it better:
| Feature | Normal Boot | Safe Mode | Clean Boot |
| Description | Starts Windows with all standard system services, drivers, and applications. | Starts Windows with minimal drivers and essential files. | Starts Windows with a minimal set of drivers and startup programs, allowing you to identify software conflicts. |
| Purpose | Regular use of your computer. | Troubleshooting hardware or driver issues, removing malware, and performing system repairs. | Identifying software conflicts causing system instability, crashes, or errors. |
| Functionality | All features and programs are available. | Limited functionality. Only basic drivers and programs like networking and keyboard work. | Limited functionality. Essential Windows services and basic drivers work, but third-party programs are disabled. |
| Internet access | Available if drivers are working. | Limited or no internet access, depending on network drivers. | May or may not have internet access, depending on network drivers and startup programs. |
| Performance | Normal performance. | Slow performance due to limited functionality. | Slow performance due to limited functionality. |
| User interface | Normal Windows interface. | Basic Windows interface with limited colors and options. | Normal Windows interface, but startup programs and services are disabled. |
| Suitability for common tasks | All tasks can be performed. | Only basic tasks like browsing the web or using text editors can be performed. | Unsuitable for everyday tasks and primarily used for troubleshooting. |
| Ease of use | Easy to use, no configuration required. | Requires selecting the specific Safe Mode option during startup. | Requires manual configuration of startup programs and services. |
Also Read: Safe Mode vs. Clean Boot: Understand the difference and when to use.
FAQs
No, a clean boot and Windows recovery are not the same. Windows recovery returns the operating system to a prior state. In contrast, a clean boot is a troubleshooting technique in Windows that boots the system with a minimal set of drivers.
No, a clean boot does not completely erase your computer’s contents. It focuses on disabling non-essential startup programs and services to identify and troubleshoot potential software conflicts.
Yes, a clean boot is safe. It is a diagnostic procedure recommended by Microsoft to troubleshoot and identify issues with third-party software or drivers causing problems on your system.
Get a Fresh Start
Performing a clean boot on Windows is a simple troubleshooting technique to identify and resolve software conflicts causing startup problems, stability issues, or performance slowdowns. We hope the guide above helped get your system back running smoothly.
Was this helpful?
Last updated on 05 February, 2024
The article above may contain affiliate links which help support Guiding Tech. The content remains unbiased and authentic and will never affect our editorial integrity.


