If your Mac acts up or keeps crashing, the built-in Recovery mode can be useful. The macOS Recovery is the diagnostic tool designed to help eliminate snags preventing your MacBook from booting up correctly. You can also use macOS Recovery to wipe your hard disk, perform disk restore from a Time Machine backup, reinstall an older macOS version, and more.

There’s also Internet Recovery mode, an internet-dependent mode that reinstalls the original macOS version shipped with your MacBook. If your Mac isn’t connecting to Wi-Fi in either of these modes, we’ve compiled some troubleshooting checks to fix the error. For regular macOS Recovery mode, you can turn off Wi-Fi and turn it back on. To do that, click the Wi-Fi icon at the top-right corner of the menu bar and select ‘Turn Wi-Fi Off.’ Re-enable your device’s Wi-Fi and try connecting to a network.

Proceed to the troubleshoot solutions below if your Mac still doesn’t find any network or if it fails to connect to visible Wi-Fi networks.
1. Check Router
Whenever you’re experiencing Wi-Fi-related connectivity issues on your mobile devices or PC, we always recommend checking that router is working properly. If your MacBook doesn’t detect Wi-Fi networks in recovery mode, make sure the router is powered on. Likewise, confirm that the router’s SSID isn’t hidden.
If it is, you could either unhide the network or manually enter its credentials (SSID and password) in macOS Recovery.
Connect to Hidden Wi-Fi in macOS Recovery Mode
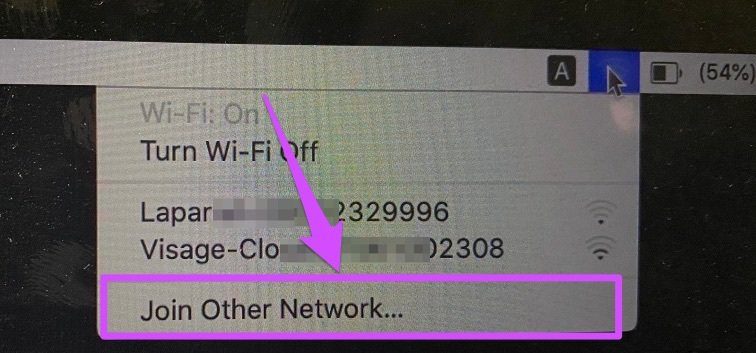
Step 1: Tap the Wi-Fi icon on the menu bar and select ‘Join Other Networks.’
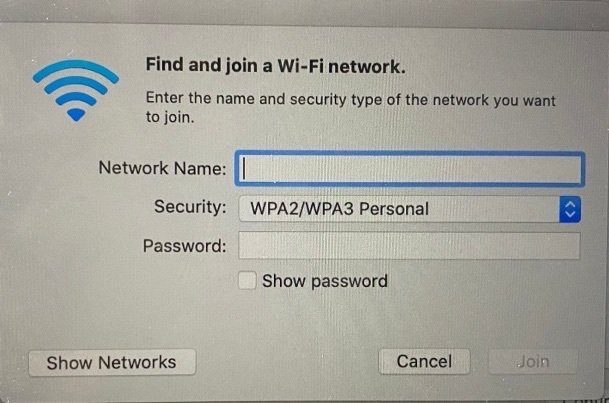
Step 2: Enter the network’s credentials (network name and password) into the specified boxes and click Join.
Connect to Hidden Wi-Fi in Internet Recovery Mode
Step 1: Tap the Choose Network drop-down button.

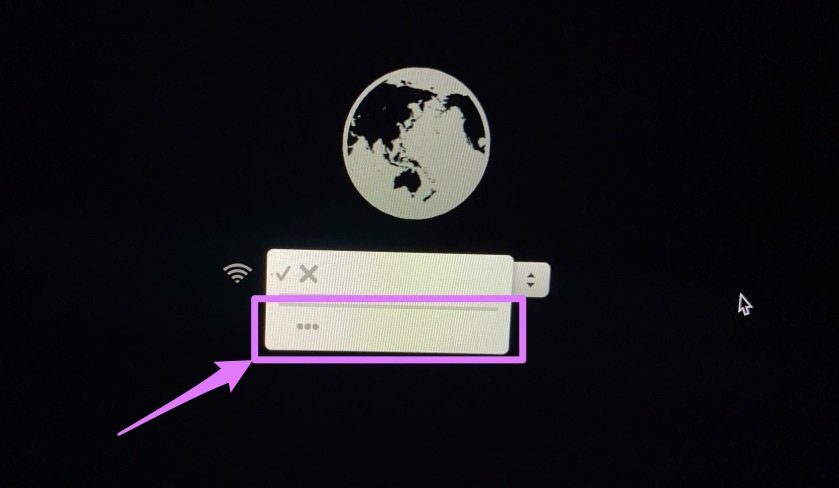
Step 2: Tap the ellipsis (three-dotted) icon to launch the Internet recovery menu’s Wi-Fi authentication page.
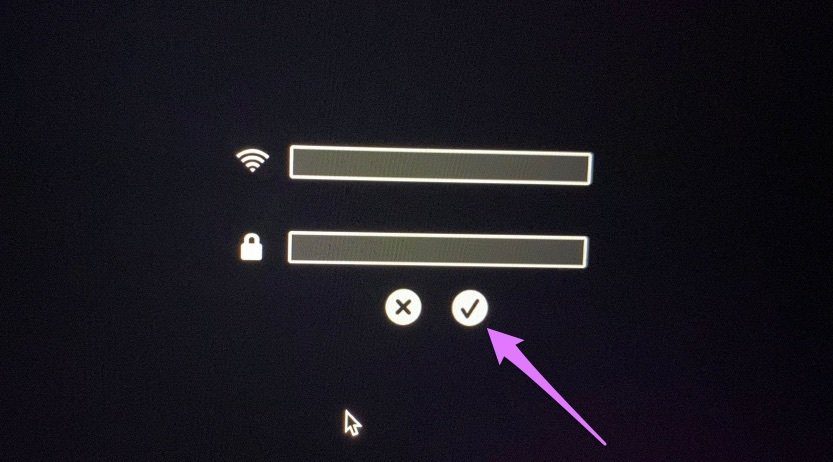
Step 3: Enter the Wi-Fi SSID and password (as displayed in the router’s control panel) into the appropriate dialog boxes and click the checkmark icon to connect to the network.
If your Mac still doesn’t connect to the Wi-Fi network (stuck on the loading icon), try moving the router closer to your Mac— or the other way round. This might help boost the Wi-Fi signal and network reception.

You could also try connecting to another network. If your Mac successfully established a connection with another router/device, there’s most likely some restriction or limitation preventing your device from connecting to the affected network. Say your Mac has been blocked on a router. For example, you cannot connect to the macOS Recovery or Internet Recovery mode network. If you have access to the router’s control center or software, check and unblock your MacBook’s MAC address.
2. Reset Mac’s Wi-Fi Settings
If your Mac is still not connecting to any Wi-Fi network in the macOS recovery menu, shut it down (hold the power button till it goes off) and restart it normally. Afterward, reset the Wi-Fi settings.
Note: Jump to method #3 if your Mac cannot startup normally.

Doing this will delete all previously-connected wireless networks on your Mac. However, you might potentially fix the glitches that prevent your Mac from connecting to Wi-Fi in macOS Recovery.
You can reset a MacBook’s Wi-Fi Settings in about three different ways. Either by:
- Deleting and readding the Wi-Fi interface.
- Deleting Wi-Fi configuration files.
- Resetting the TCP/IP stack.
Check out our comprehensive guide on resetting Wi-Fi Settings on Mac for step-by-step instructions on each of the methods listed above. After the Wi-Fi reset, check if you’re able to establish a connection with a Wi-Fi network in regular mode. If you can, shut down your Mac, restart in Internet Recovery mode (hold Command + Option + R after pressing the power button) and try connecting to Wi-Fi.
Alternative: Use Ethernet

In terms of stability and usage experience, ethernet is way better than Wi-Fi. Interestingly, Mac supports the use of ethernet in Internet Recovery mode. So, if your MacBook isn’t connecting to Wi-Fi in recovery mode, most likely due to complex system errors or hardware damages, you might have to resort to installing macOS in recovery mode via Ethernet.
For older MacBooks with an ethernet port, insert an ethernet cable plugged into a router (or whatever internet source) while in recovery mode. Your Mac will automatically detect the ethernet cable and immediately commence the macOS download.

For Macs without a built-in ethernet port (most modern Macs), you’ll need a USB-C-to-Ethernet adapter to hook your device to an ethernet cable. Check out some of the best ethernet adapters for Mac that offer the best value for money.
Get Your Mac Checked
It’s worth noting that Internet Recovery mode only works on MacBooks, MacBook Pros, and iMacs released between 2010/2011 and newer. If you have an older Mac running Mac OS X Lion or anything below, it might be unable to connect to Wi-Fi in Recovery mode. And if your MacBook still won’t connect to Wi-Fi in macOS Recovery mode after trying the above troubleshooting tips, visit an authorized Apple Store or repair center to get it checked for possible hardware damages on the Wi-Fi antenna or hard disk.
Next up: Does your Mac gets stuck on a black screen when booting up? If yes, refer to the solutions in the guide linked below to fix your Mac and revive it without breaking the hell loose.
Was this helpful?
Last updated on 13 July, 2021
The article above may contain affiliate links which help support Guiding Tech. The content remains unbiased and authentic and will never affect our editorial integrity.

