Does Windows keep changing the default audio device randomly? Such behavior can disrupt the harmony of everyday tasks and create unnecessary confusion. Fortunately, there’s no need to keep switching the audio device repeatedly on your Windows 10 or 11 PC, as it is possible to fix this rather peculiar issue.

Whether you’re enjoying music, participating in voice or video calls, or gaming, your audio devices’ consistent and reliable functioning on Windows plays a pivotal role. This post lists some useful tips to prevent Windows from changing audio devices randomly.
1. Disconnect Unwanted Audio Devices
This may seem obvious, but disconnecting unwanted audio devices from your PC is a straightforward way to stop Windows from changing the default audio device. Alternatively, you can disable the audio devices you don’t intend to use. Here’s how:
Step 1: Right-click on the speaker icon on the taskbar and select Sound settings.
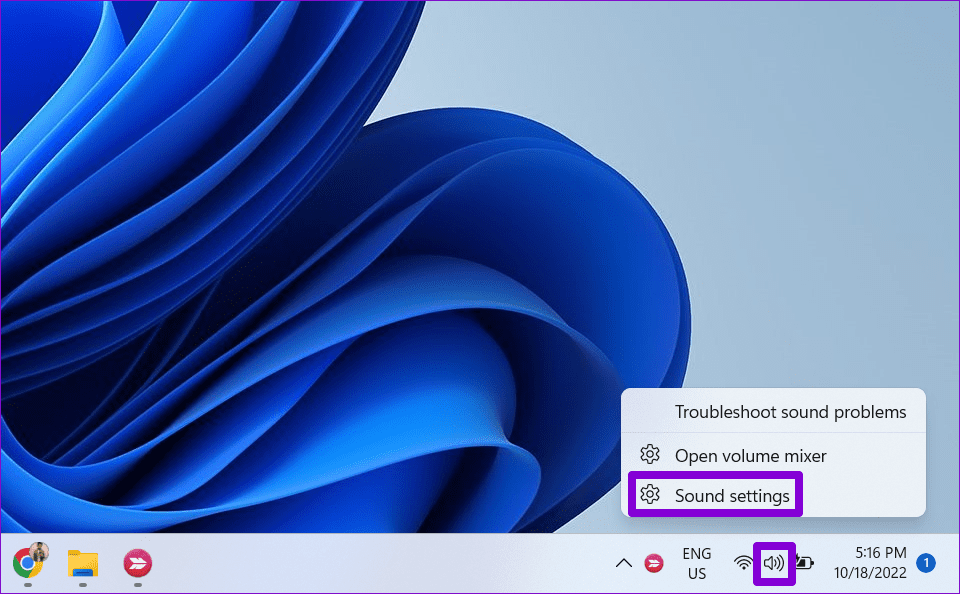
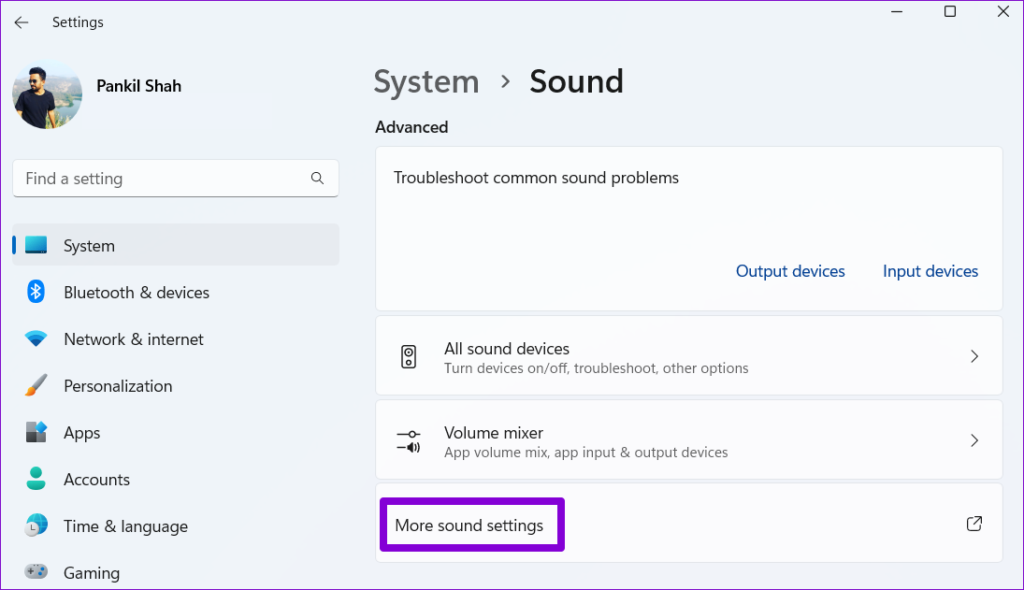
Step 2: Click on More sound settings.
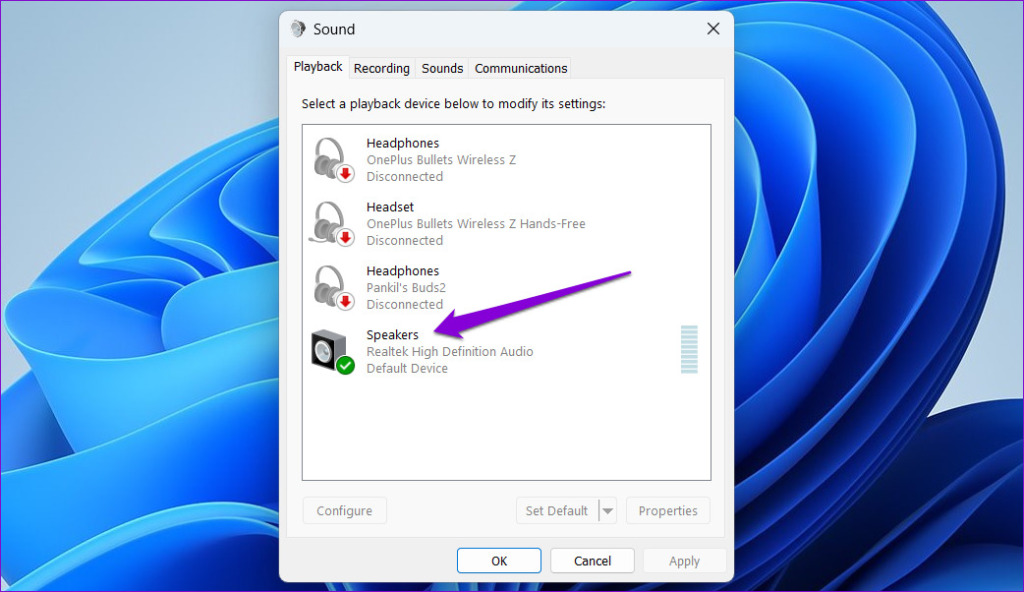
Step 3: Under the Playback tab, right-click on the unwanted audio device and select Disable from the context menu. Repeat this step to disable all unwanted devices.

2. Set Your Audio Device as Default for Audio and Communication
On Windows, you can set up different audio devices for audio and communication purposes. If your preferred device is set as the default only for general audio, Windows might use a different device for communication activities such as voice and video calls. To avoid any confusion, set your sound device as the default option for audio and communication.
Step 1: Click the search icon on the taskbar, type in sound settings and press Enter.

Step 2: Click the arrow next to your preferred audio device.

Step 3: Click the drop-down menu next to ‘Set as default sound device’ and select ‘Use as default for audio.’

Step 4: Click the drop-down menu again and select ‘Also use as default for communications.’

3. Disallow Apps Exclusive Control Over Audio Devices
Allowing apps exclusive control over your audio device can also result in such anomalies. To fix this, you need to disallow apps exclusive control over your audio device. Here’s how:
Step 1: Press the Windows key + R keyboard shortcut to open the Run dialog box. Type control mmsys.cpl sounds in the box and press Enter.

Step 2: In the Sound window, double-click on your audio device to open its properties.
Step 3: Under the Advanced tab, untick the ‘Allow applications to take exclusive control of this device’ checkbox. Then, hit Apply followed by OK.

4. Run Windows Troubleshooters
Running the built-in Playing Audio troubleshooter on Windows is a reliable way to address various sound-related issues. The troubleshooter will scan your system for common audio problems and attempt to fix any issues it finds.
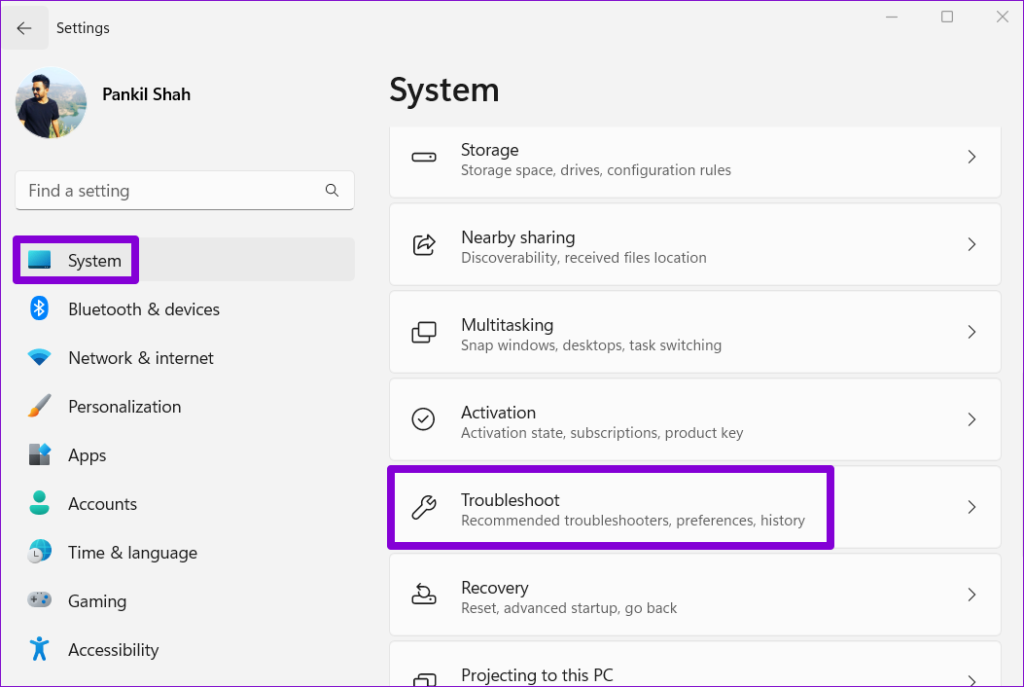
Step 1: Press the Windows key + I keyboard shortcut to open the Settings app. In the System tab, click on Troubleshoot.
Step 2: Go to Other troubleshooters.

Step 3: Click the Run button next to the Playing Audio troubleshooter.

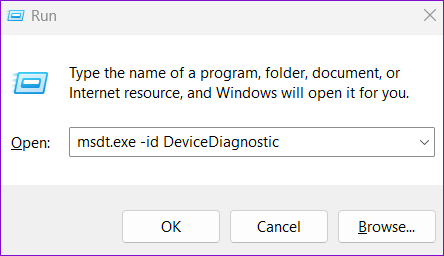
Additionally, you may also run the Hardware and Devices troubleshooter to fix any configuration issues with your audio device. To do so, use these steps:
Step 1: Press the Windows + R keyboard shortcut to open the Run dialog box. Type the following command in the Open field and press Enter.
msdt.exe -id DeviceDiagnostic
Step 2: Click on Advanced.
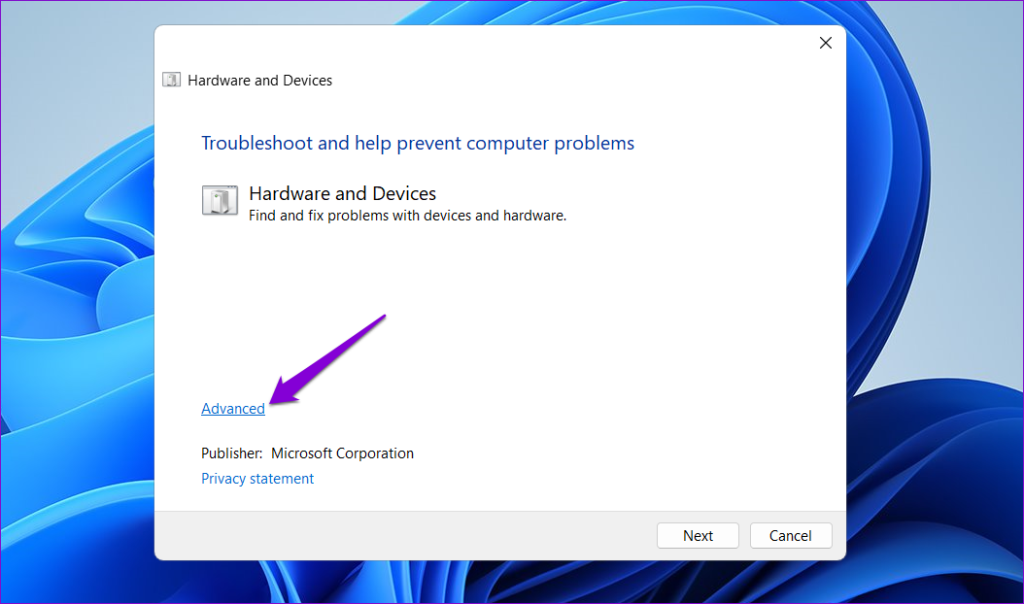
Step 3: Tick the Apply repairs automatically checkbox and click Next. Then, follow the on-screen prompts to finish running this tool.

5. Update or Reinstall Audio Drivers
Audio drivers on your PC facilitate communication between Windows and your audio devices. If these drivers have become outdated, you could experience problems. Here’s what you can do to update them.
Step 1: Right-click on the Start icon and select Device Manager from the list.

Step 2: Double-click on ‘Sound, video and game controllers’ to expand it. Right-click on your audio device and select Update driver. Then, follow the on-screen prompts to finish updating the driver.

If the issue persists, you can try uninstalling the audio driver. After that, restart your PC, and Windows will install the missing driver whenever it boots next.

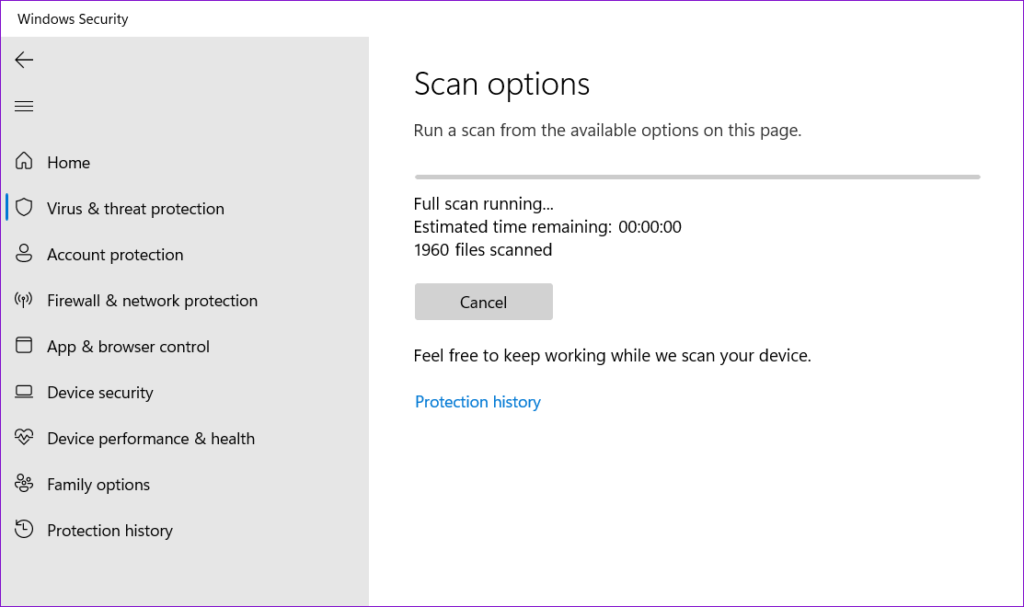
6. Scan for Malware
Such issues can also arise if your computer is infected with malware. To overrule this possibility, you can try running a full system scan using Windows Defender or a reliable antivirus program. If the scan detects any malware or suspicious programs, take the recommended steps to remove them.
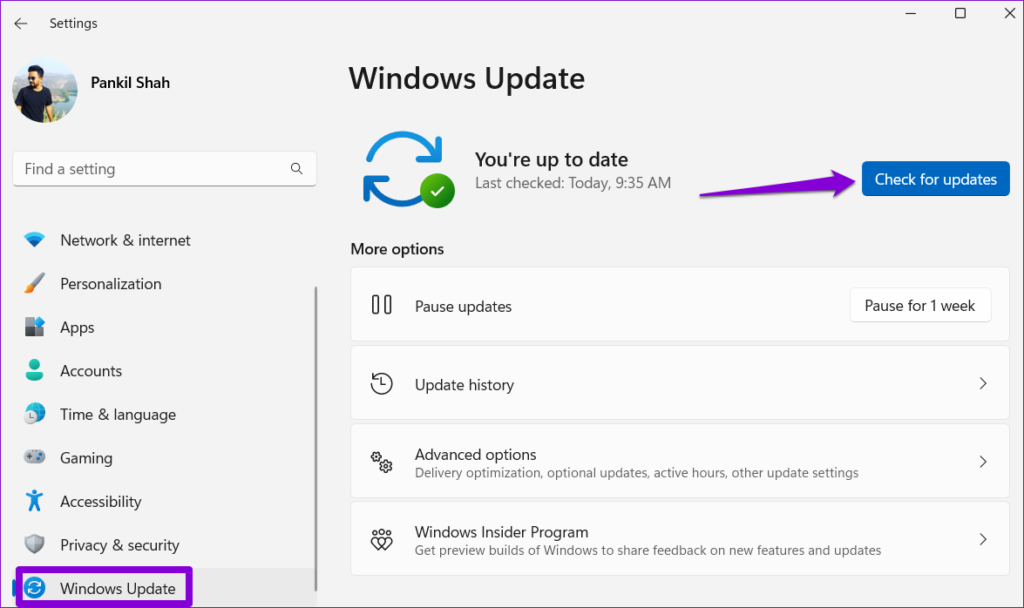
7. Install Windows Updates
Lastly, if nothing works, you can install any pending Windows updates. If the issue occurs due to a bug or unstable build, this will help. Press the Windows key + I keyboard shortcut to open the Settings app. In the Windows Update tab, click the Check for updates button to download and install any pending updates.
Enjoy a Solid Sound Setup
It can be confusing if the audio device on your Windows PC keeps switching from headphones to speakers or vice versa. Hopefully, that is no longer happening, and one of the above tips has helped end the unwarranted switch of your default audio device on your Windows 10 or 11 PC.
Was this helpful?
Last updated on 05 December, 2023
Read Next
 Bext 6 Fixes When the Windows 11 Power Plan Keeps Changing
A power plan is a preconfigured setting that manages how the computer utilizes power.
Bext 6 Fixes When the Windows 11 Power Plan Keeps Changing
A power plan is a preconfigured setting that manages how the computer utilizes power.
 6 Ways to Fix if Google Chrome Keeps Changing Themes
Fix 1: Disable the "Customize Chrome Color Extraction" Flag A common reason Google Chrome may keep changing themes automatically is if the "Customize Chrome Color Extraction" flag is active.
6 Ways to Fix if Google Chrome Keeps Changing Themes
Fix 1: Disable the "Customize Chrome Color Extraction" Flag A common reason Google Chrome may keep changing themes automatically is if the "Customize Chrome Color Extraction" flag is active.
 5 Ways to Fix Desktop Background Keeps Changing in Windows 11
Fix 1: Check Desktop Background Settings Enabling wallpaper slideshow in Windows can cause your desktop background to change at regular intervals.
5 Ways to Fix Desktop Background Keeps Changing in Windows 11
Fix 1: Check Desktop Background Settings Enabling wallpaper slideshow in Windows can cause your desktop background to change at regular intervals.
 How to Stop Edge From Changing Default Search Engine
Common Fixes Avoid recommended settings: Skip the recommended settings popup in Microsoft Edge to avoid changing its default search engine.
How to Stop Edge From Changing Default Search Engine
Common Fixes Avoid recommended settings: Skip the recommended settings popup in Microsoft Edge to avoid changing its default search engine.
 How to Fix Search Engine Keeps Changing to Yahoo in Chrome
Google Chrome remains the most popular desktop browser out there.
How to Fix Search Engine Keeps Changing to Yahoo in Chrome
Google Chrome remains the most popular desktop browser out there.
 9 Best Ways to Fix Google Home Volume Keeps Changing Issue
The volume of Google Home smart speakers can be changed in multiple ways.
9 Best Ways to Fix Google Home Volume Keeps Changing Issue
The volume of Google Home smart speakers can be changed in multiple ways.
 6 Ways to Fix Apple Watch Face Keeps Changing
Basic Fixes Restart Apple Watch: This issue can often be caused by a temporary bug, and a simple restart should fix it.
6 Ways to Fix Apple Watch Face Keeps Changing
Basic Fixes Restart Apple Watch: This issue can often be caused by a temporary bug, and a simple restart should fix it.
 12 Ways to Fix iPhone Brightness Keeps Changing
Picture this: you are reading or watching something on your iPhone, and suddenly, its brightness changes.
12 Ways to Fix iPhone Brightness Keeps Changing
Picture this: you are reading or watching something on your iPhone, and suddenly, its brightness changes.
The article above may contain affiliate links which help support Guiding Tech. The content remains unbiased and authentic and will never affect our editorial integrity.